An article by Andrew Roberts
Most clarinet players subsidize the reed manufacturer of their choice by rejecting a large proportion of the reeds that they buy.
There is a solution which will only take a little practice before you should start saving money, and a great deal of frustration.
Understanding how the reed works gives us a better chance of improving its performance. Learning how to test the reed takes some time to master, however, you may well find that even without testing the reeds successfully, the technique described will improve most reeds.
Reeds vibrate in the air-stream because the speed/force of the air pushes the blade of the reed to seal against the mouthpiece rails. The pressure drops inside the chamber of the mouthpiece and the reed then acts as a spring and jumps off the mouthpiece rails back into the airflow repeating this many times per second.
The reed works in conjunction with the mouthpiece and that means that ideally you need to assess the two together. If you are using an asymmetrical mouthpiece, the reed balance needs to have less resistance on the side that is more open.
Most designs of mouthpiece are likely to be symmetrical, which makes balancing the reed much easier. (A symmetrical mouthpiece has an even curve over the full length of the lay)
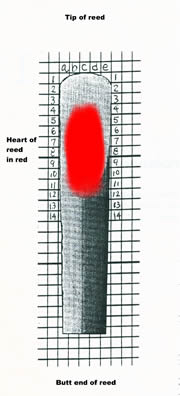
It is vital that the reed is completely moist before you play, test or make any adjustment to it. This means trying to get as much water into the cane as possible, wetting both the tip and the butt end (see diagram) until the back of the cane appears really wet. The reed has no flexibility until it is wet, so any test you make may be flawed if you don’t make the reed wet first.
The minute tubes in the cane will transmit any moisture straight from the tip to the butt end of the cane, with the help of gravity. Drawing the moisture into the cane by sucking helps speed up the process, and will save a lot of wasted effort both when testing and playing on the reed.
The procedure for testing the reed involves playing the reed firstly in the normal position, then with the tip slightly further out of the embouchure, rotating the tip to damp the left wing and then rotate again to the opposite side to test the right wing. It really is worth being patient at this stage. Blow with the same air stream on both sides and note any difference in the resistance between the two sides. The side with the most resistance is the one you will need to adjust.
The simplest and most effective way to correct the imbalance (once you have discovered where it is) is to use a piece of plate glass measuring approximately 6″x4″x1/2 and a rectangular block of either wood or plastic measuring roughly 3″x2″x1″.
The block needs to be wrapped in fine emery paper around 600 grade is enough to take a reasonable amount of the surface of the reed. Use double sided tape hold the emery onto the block, don’t overlap the emery but wrap it around all the sides with the tape holding the two edges tightly together.
 The reed needs to be held firmly on the glass. The block with the emery is slid completely flat, rather surprisingly, from the tip sliding down the reeds top surface towards the butt end of the cane.
The first moves need to be just around the tip with gentle even strokes back towards you not going back up towards the tip and no further than 1/2″ from the tip to balance it (down to no3 and across from A-E on the diagram).
Once you can recognize the side that needs to be adjusted, you can refine the test by blowing as described above but change the air to a gradual diminuendo. Again the side that doesn’t ring in a sustained diminuendo will need attention.
If you had noted an imbalance with your test, you now needs to work from the tip on the side you found to have the most resistance down the side of the heart of the reed (the red area on the diagram). You should not make any changes to heart of the reed, only work on the tip and the sides between no 4-9 on the diagram. Make just a few strokes always keeping the block flat to the glass and test the reed again.
One way to improve your ability to remove the material from the right place on the reed is to mark the area with a pencil and then work the area to remove the mark; this will help you to be more accurate with the adjustment of your reeds.
In my experience most commercially available reeds have more resistance on the right hand side, using a symmetrical mouthpiece.
This means that even if you can’t test your reeds to well to start with, you can try correcting the right side first, and you should be able to improve at least some of the reeds that will otherwise have been consigned straight to the bin!
Remember, like everything else this will take some practice, but in time you will feel some improvements and a sense of satisfaction knowing that you are saving some money.
This is a very brief description of quite a complex area and is designed only as an introduction to adjusting reeds. Tom Ridenour’s “Against The Grain “ ATG system for balancing reeds includes a comprehensive book tools and DVD to show you how to make refined adjustments to your reeds. It is available from his website at http://www.ridenourclarinetproducts.com/ATG1.html.
If you have any further questions please contact me and I will try to help!